
This guide will help you create a Google Tag Manager account, obtain your Container ID, and connect it to your BettaMax store. GTM allows you to manage all your tracking codes (GA4, Facebook Pixel, TikTok Pixel) from a single location without needing to edit any code. The process takes approximately 15 minutes.
Before we begin:
- I have a Google (Gmail) account.
- I have logged into BettaMax Admin at admin.bettamax.com
- There is already at least one product in the BettaMax store.
Step 1: Create an account and obtain a Container ID on Google Tag Manager. #
You need to create a separate GTM Container for each store. The Container ID will be used to connect to BettaMax in the next step.
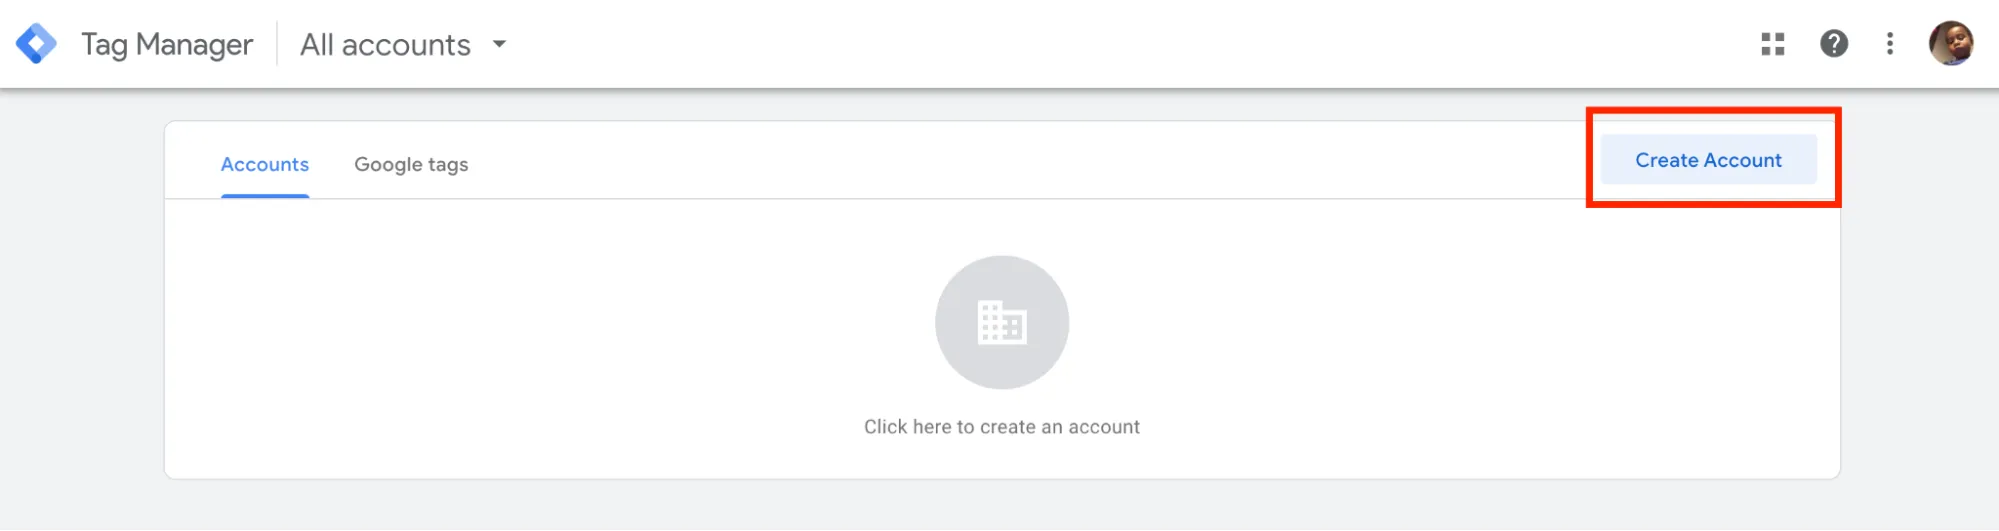
- Go to tagmanager.google.com and sign in with your Google account.
- Click Add a new account .
- Enter your Account Name and select your Country .
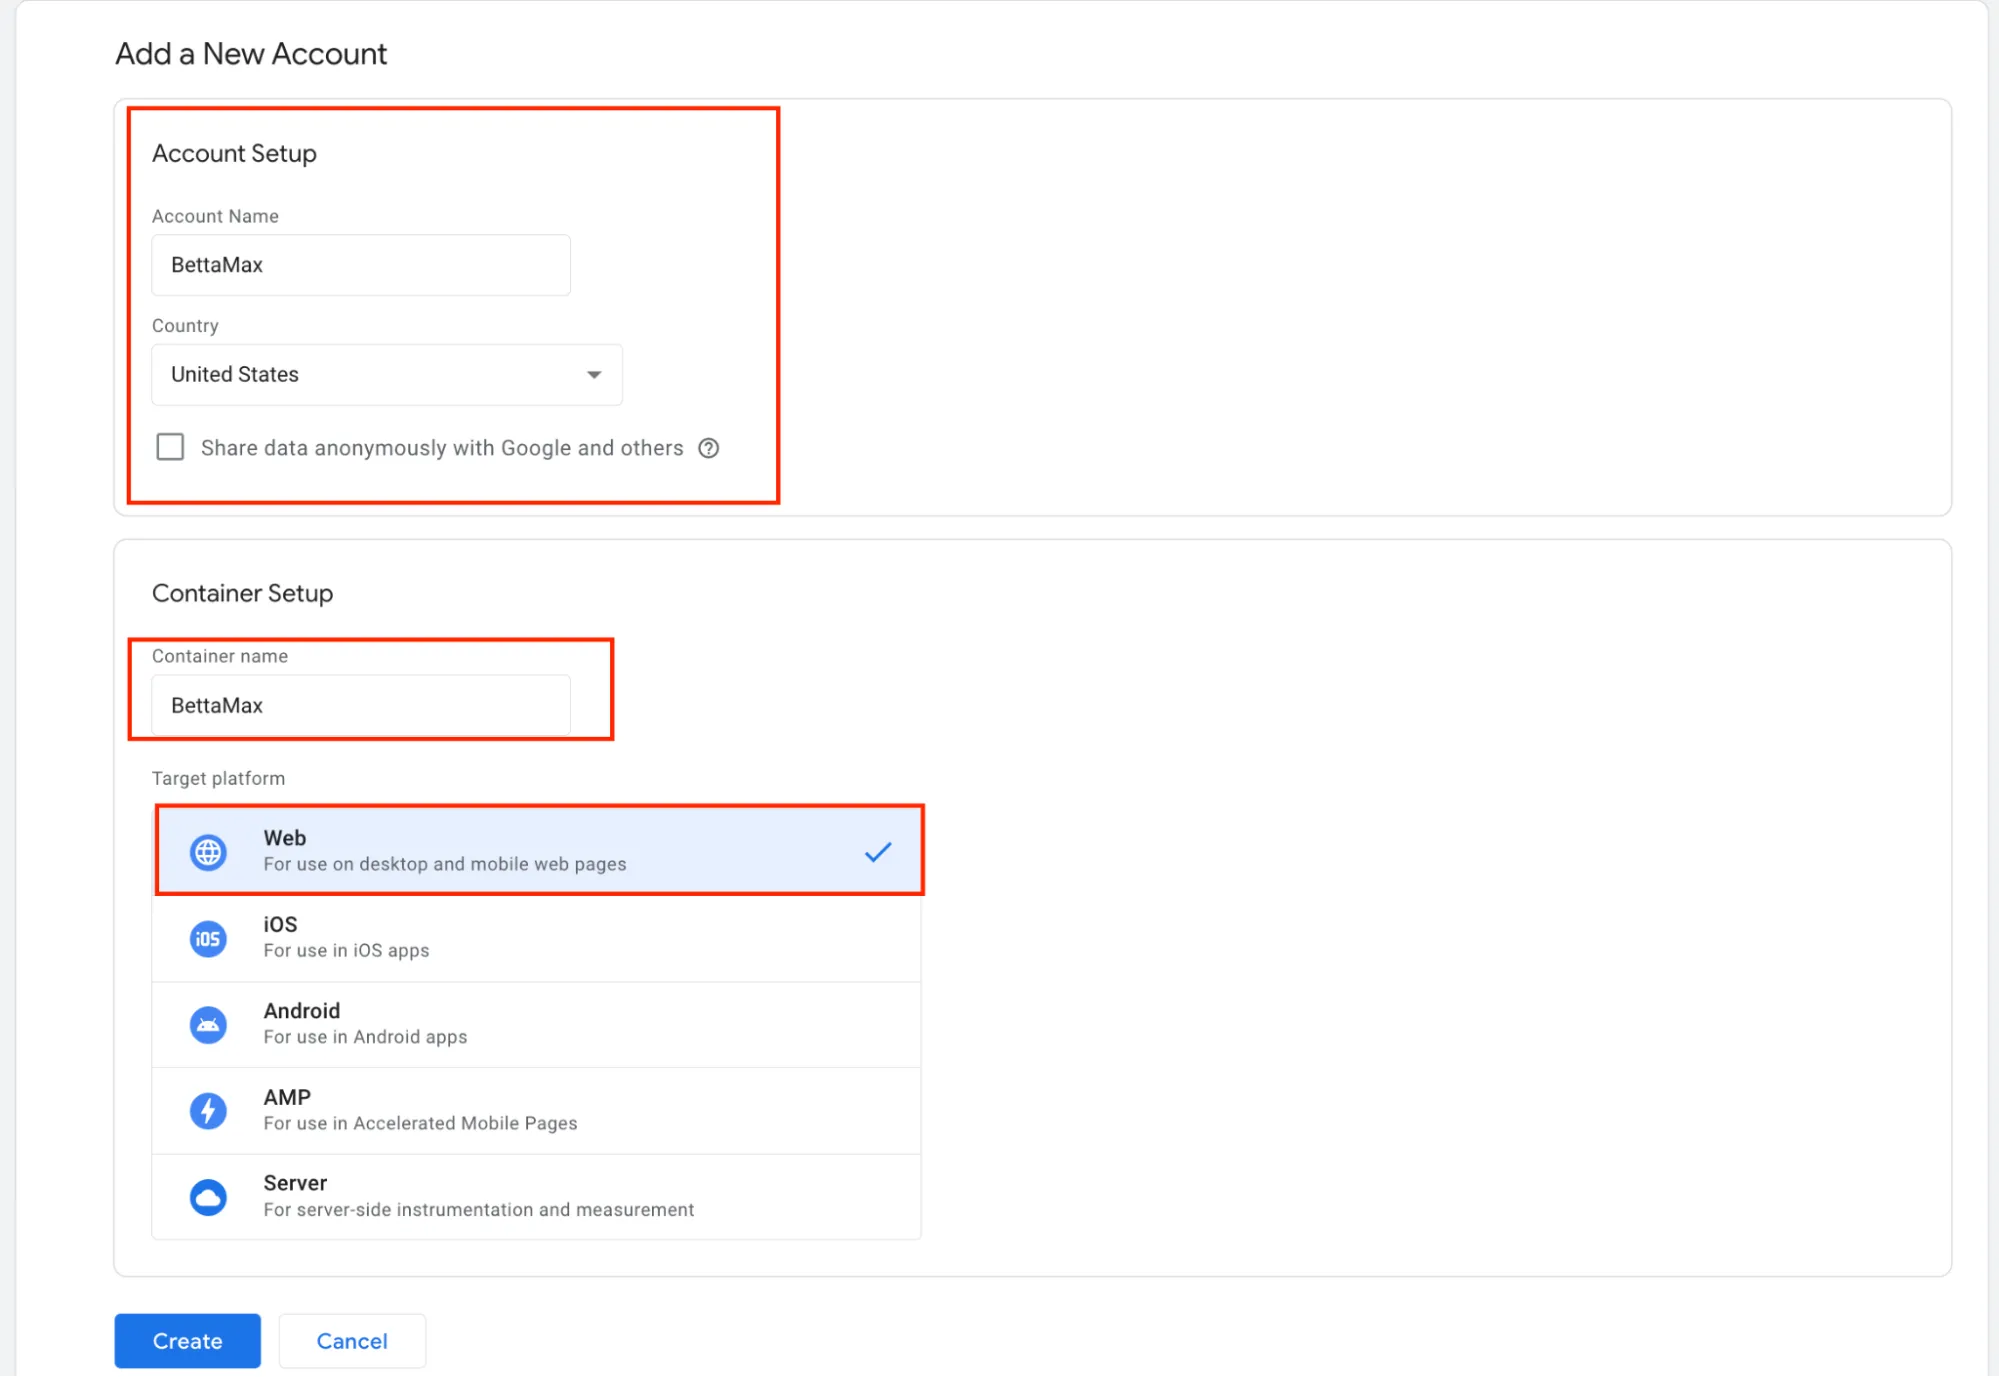
- In the Container setup section , enter the container name in the Container name field .
 Tip: Name your containers the same as your stores to make it easier to distinguish them when managing multiple stores simultaneously.
 - Select your web platform in the Target platform section .Note: Select Web if you are using the BettaMax store in a browser. The iOS, Android, and AMP options are for the mobile app.
- Click Create , then agree to the terms of service.
- The system displays the installation code. Copy the Container ID located
GTM-XXXXXXXat the beginning of the code.
 Note: Container IDs are in the format `<container ID
GTM-XXXXXXX>`, which is different from GA4’s Measurement ID (which is in the formatG-XXXXXXXXXX). Make sure you copy the correct ID that starts with `<container ID>`GTM-.
Step 2: Add Container ID to BettaMax #
After obtaining the Container ID, you connect to the BettaMax store via the Settings page. Each product can be assigned a unique Container ID.
- Log in to BettaMax Admin at admin.bettamax.com .
- Go to Settings > Google Tag Manager > tap Add Pixel ID .
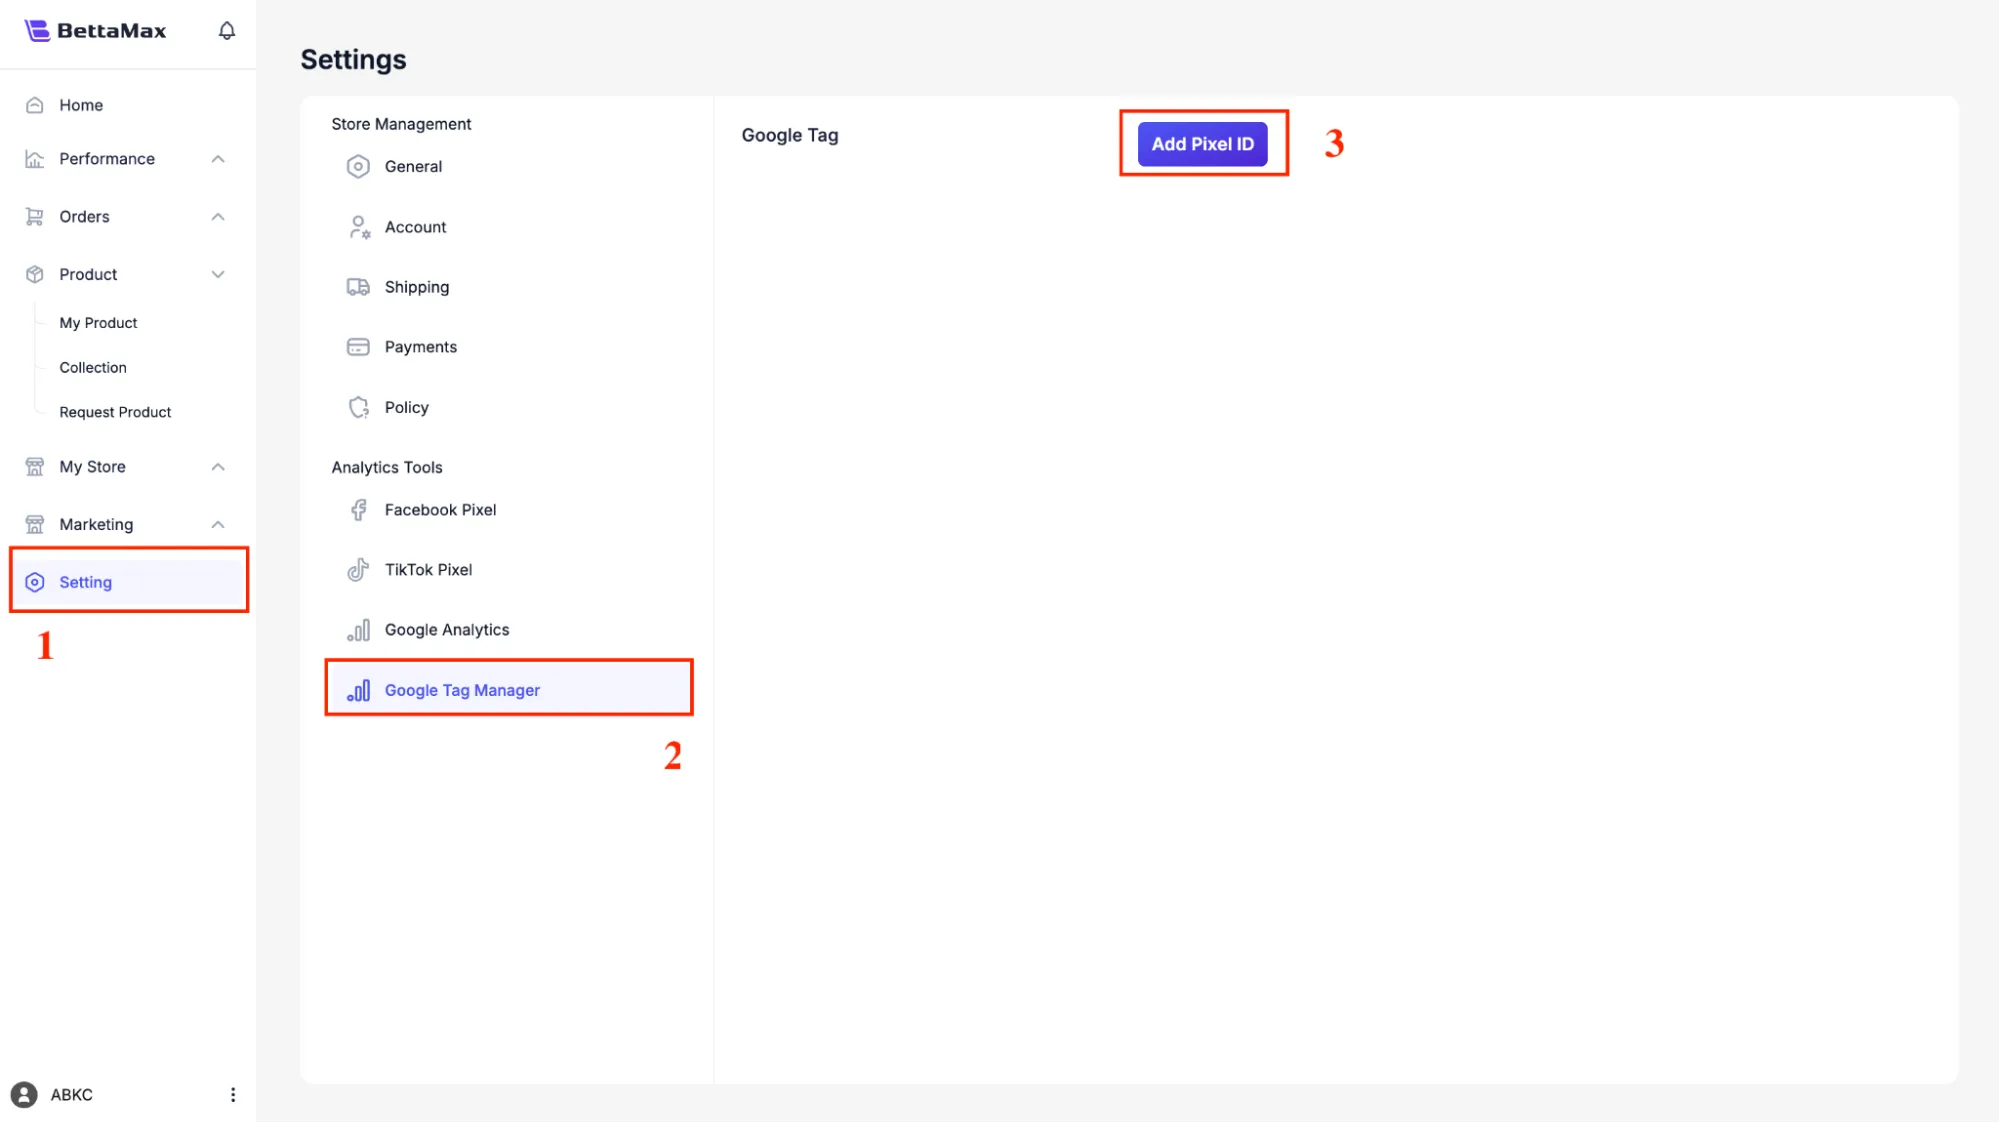
- Paste the Container ID into the Paste Google Tag ID box .

- Find the product you want to tag in the Search Product box .
- Click Add Tag to confirm.
Step 3: Verify successful connection #
After adding the tag, check immediately in BettaMax to confirm that the Container ID has been correctly assigned to the product.
- Go to My Products and find the product you just tagged.
- Click the pen icon (edit) next to the product name.

- Check the Google Tag column : if it displays Container ID (
GTM-XXXXXXX), the connection is successful.
Step 4: Set up call switching (advanced option) #
This section guides you on creating tracking tags that customers will use when they click the call button on your store. All steps are performed within the Google Tag Manager interface.
tel:). Otherwise, skip and proceed to Step 5.4.1 — Creating Triggers #
A trigger defines the conditions under which a tag is activated. Here, you create a trigger that recognizes when a customer clicks the call link.
- In GTM, go to Triggers > click New .
- Click on the Trigger Configuration box and select the Just Links type .
- In the configuration section, set the condition: Click URL > Start with > enter
tel. - Click Save and name the trigger (for example, “Click to call”).
4.2 — Creating Tags #
A tag is a tracking code that will be triggered when a trigger detects an event. You use GA4 Event tags to record phone calls.
- Go to Tags > click New .
- Click on the Tag Configuration box and select Google Analytics: GA4 Event .
- Go to Google Analytics > Data Flow , and copy the Measurement Code (in the format
G-XXXXXXXXXX). - Paste the measurement code into the Measurement ID field in GTM.
- In the Triggering section , select the “Click to call” trigger you created in step 4.1.
- Name the tag ” Call” and click Save .
Step 5: Test functionality with Preview & Debug #
Before publishing, use GTM’s Preview mode to confirm that the tag is correctly activated. This is a mandatory step to avoid errors affecting the entire store.
- In GTM, select the container you want to inspect.
- Press the Preview button in the upper right corner.
- The Tag Assistant window opens. Paste your store URL into the website URL field .
- Click Connect . The browser opens a new tab with the store and displays the debug panel below.
- Perform an action on the store (e.g., click the call link). Check the debug panel to confirm the tag appears in the Tags Fired list .
- If the tag appears in Tags Fired , return to GTM and press Submit to publish.
The main components in the GTM interface #
The GTM interface consists of 6 components. Understanding each component helps you manage tags more quickly when you need to make edits later.
| Ingredient | Function |
|---|---|
| Tags | List of tracking codes: GA4, Facebook Pixel, Google Ads, TikTok Pixel… |
| Triggers | Conditions for tag activation: clicks, page views, successful transactions… |
| Variables | Save dynamic data: Page ID, current URL, order value… |
| Folders | Categorize and group tags, triggers, and variables for easier management. |
| Preview | Verify that the tag is working correctly before publishing. |
| Submit | Publish the new version to the physical store. |